

I built a fully configurable luxury handbag, with a cinematic promo video, inside NVIDIA Omniverse — and I wrote almost none of the code by hand. This is the full workflow: concept, procedural 3D modeling, an AI-assisted debugging loop with Claude, the problems we hit, and how a Dell Pro Max 16 Plus with an NVIDIA RTX PRO 5000 Blackwell handled the rendering.
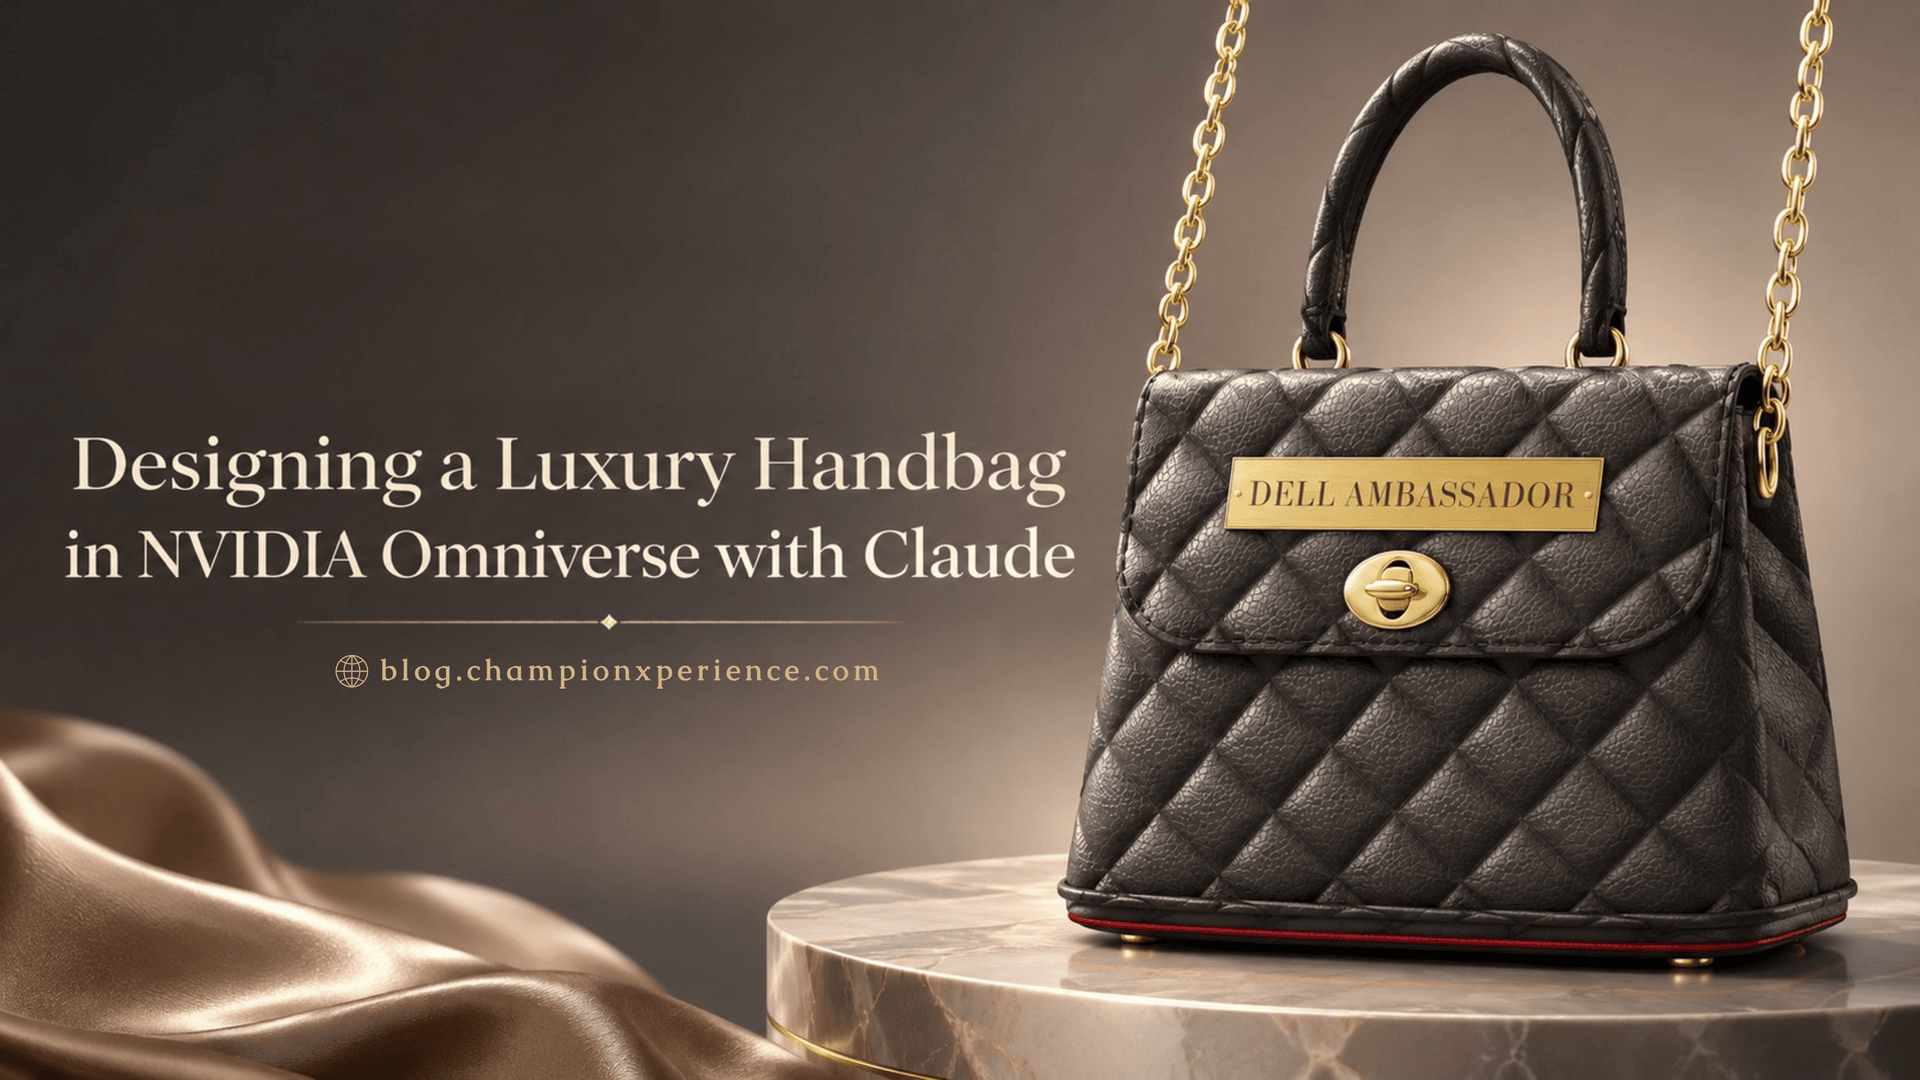
The goal was a luxury handbag that a client can configure live in NVIDIA Omniverse and then see in a polished promo video — all from one tool.
I wanted to explore a practical question: how far can one designer go in NVIDIA Omniverse with an AI assistant writing and debugging the code? Although I’m not a USD or Python specialist, I understand what makes a premium bag look right and can identify issues directly in the viewport. Claude handled the entire technical side, from writing and testing the code to debugging and refining the final result.
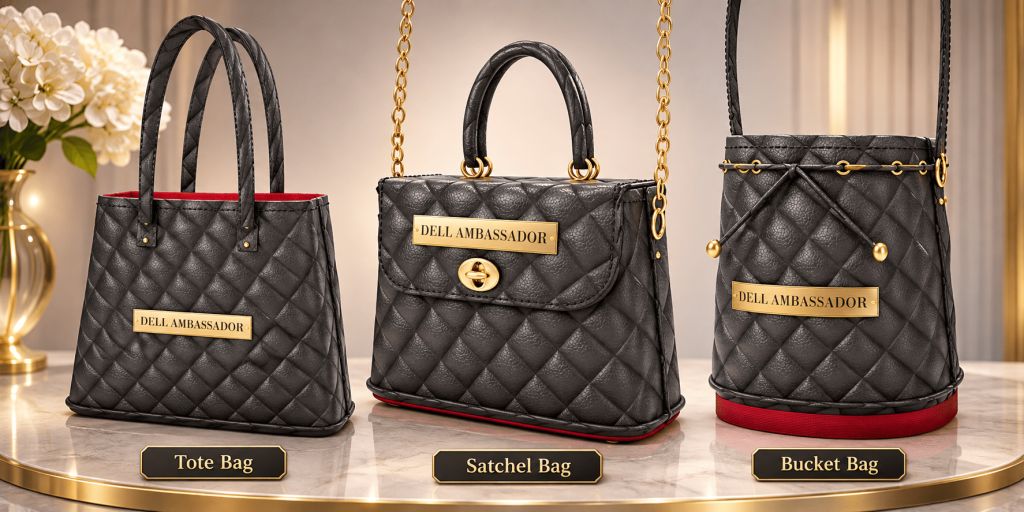
The project had four objectives:
Everything runs as a custom Kit extension (handbag.configurator) inside a USD Composer-based app built from NVIDIA’s Kit App Template.
Figure 1: Hero render of the finished bag, e.g. Maison Aurèle in black quilted leather with the gold chain
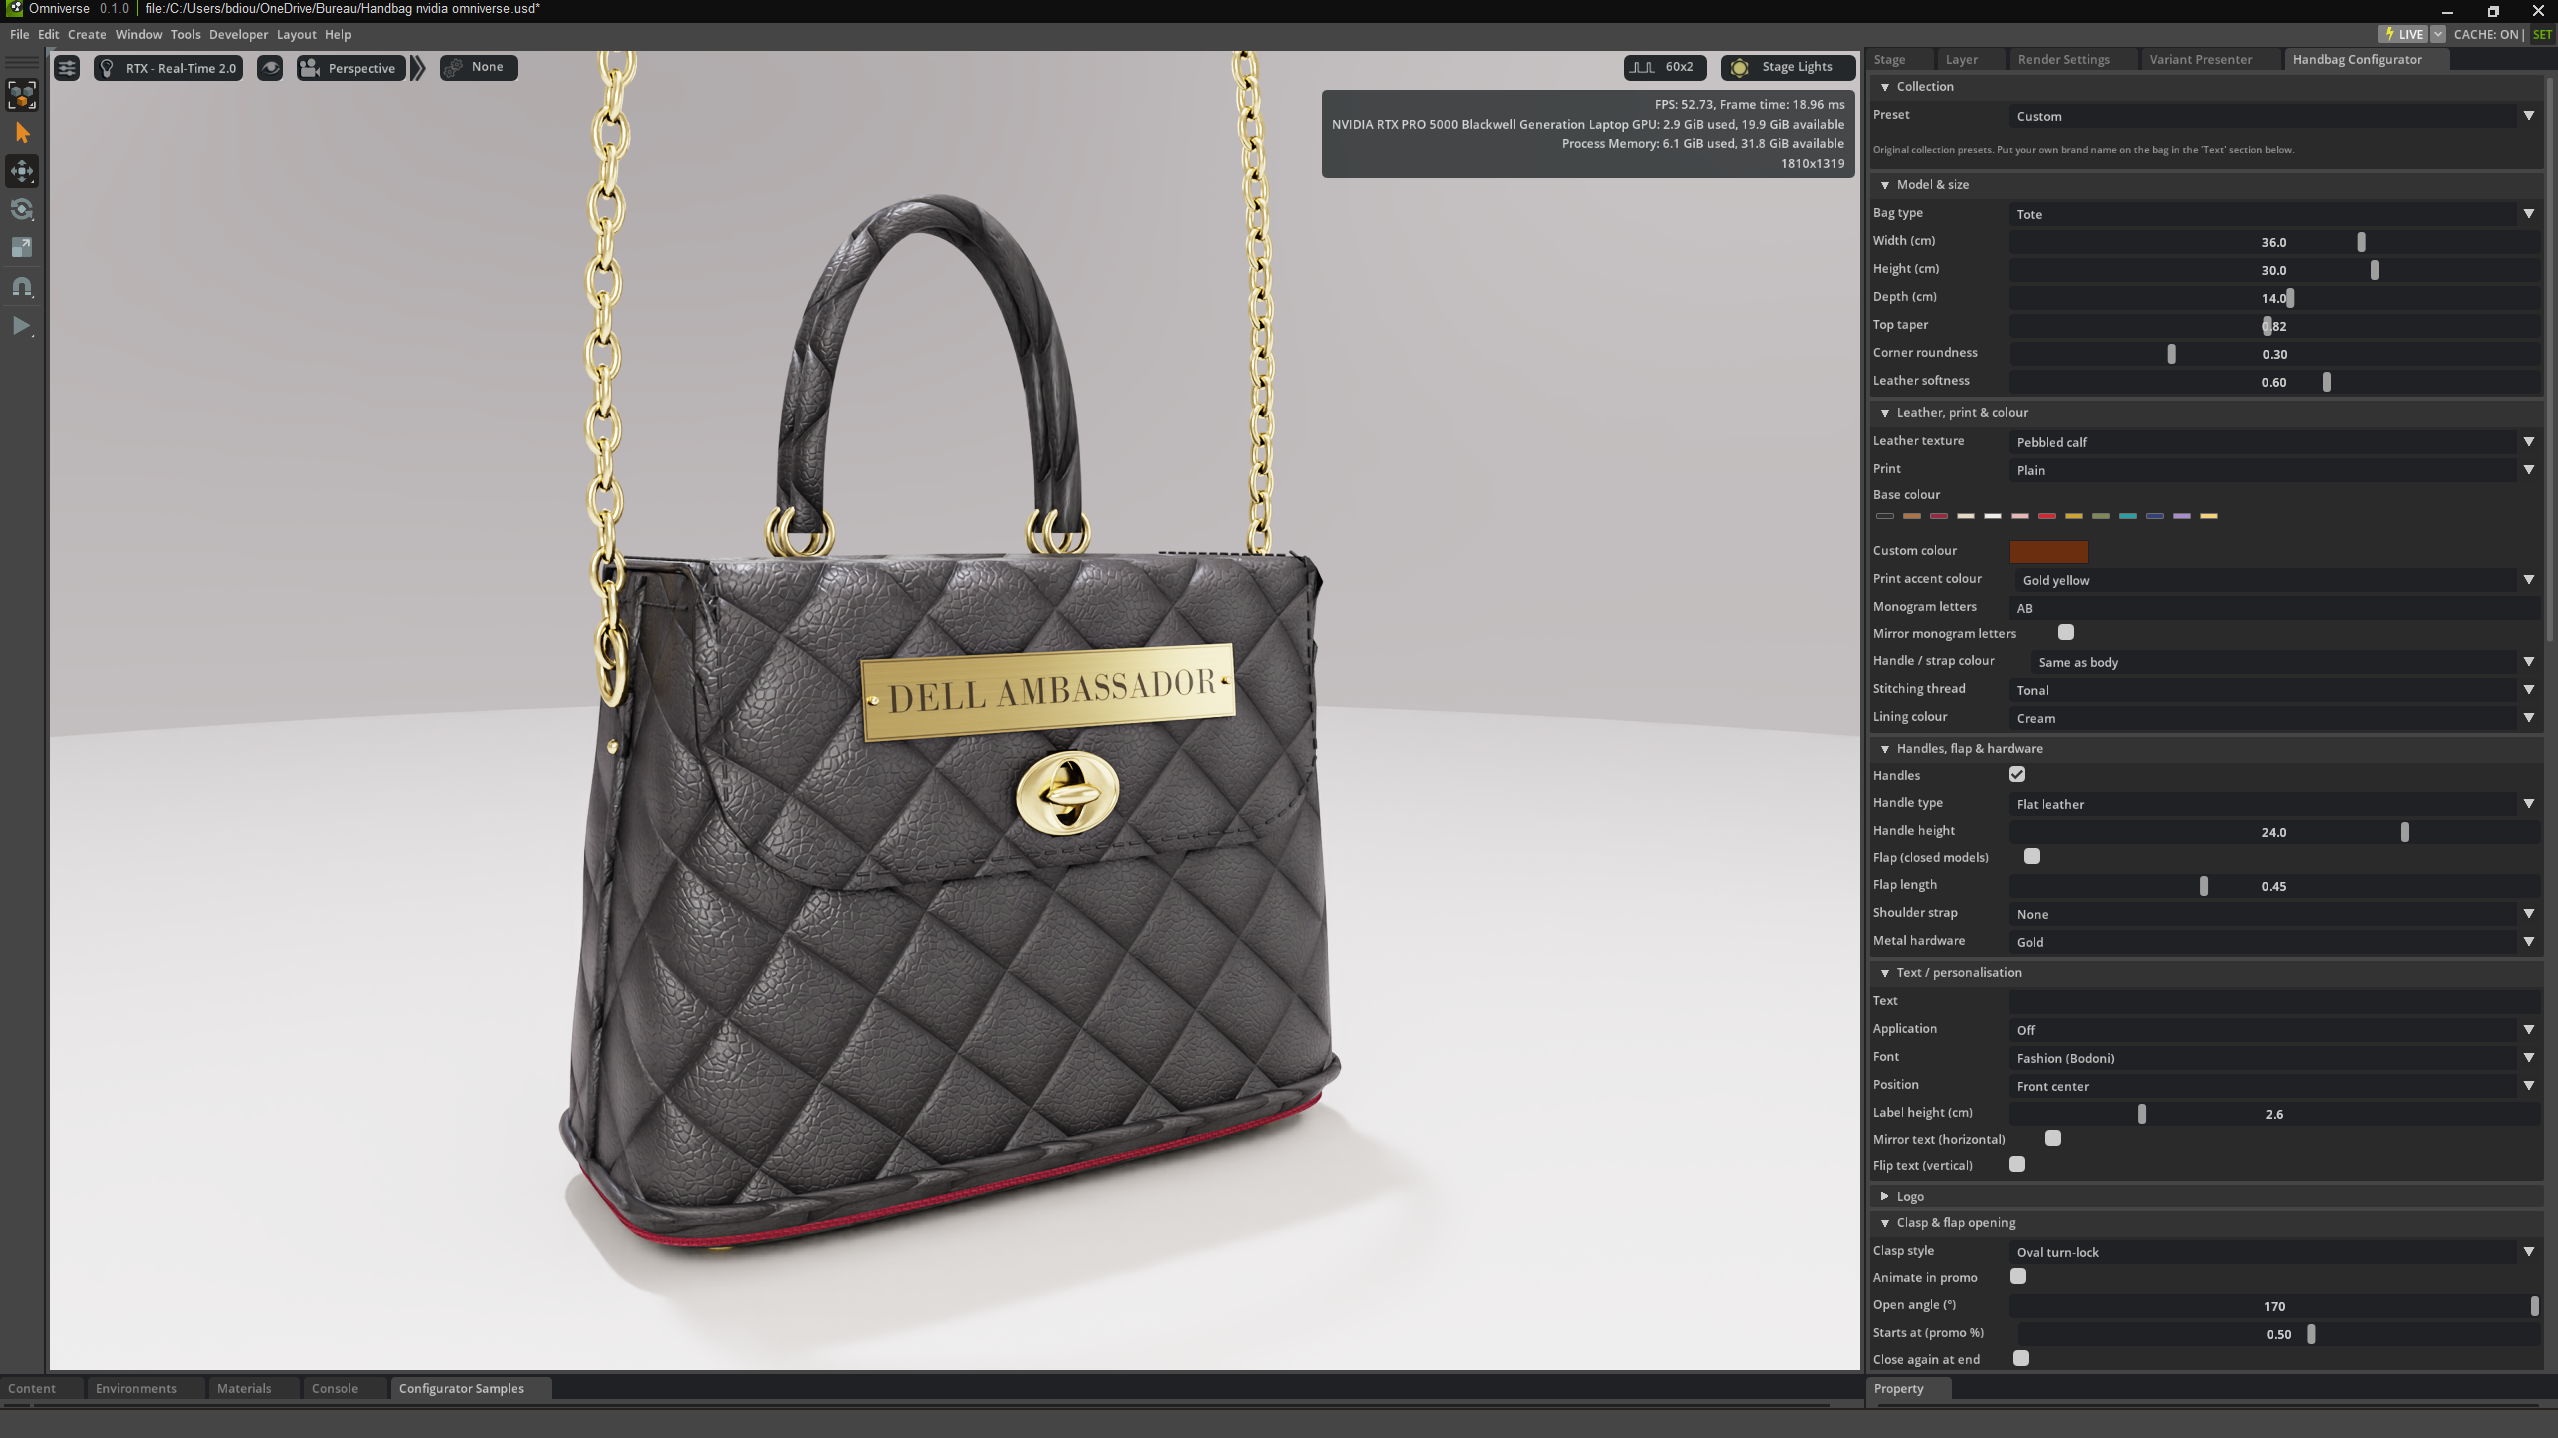
Figure 2: Screenshot of the Omniverse window with the Handbag Configurator panel open beside the viewport
The bag is fully procedural: Python generates every mesh from a handful of parameters, so changing the width or the flap length rebuilds the whole bag in under a second.
I chose procedural over sculpted geometry because a configurator needs parts that adapt to each other. When the body gets wider, the flap, stitching, handles, strap rings and even the graphics card inside must follow. Each part is computed from the same body description.
The body is built from horizontal cross-sections (rings) stacked from the base to the top. Each ring is a superellipse, so one “corner roundness” value moves the shape from boxy to soft.
On top of that base shape, three effects make it read as leather instead of plastic:
The base has a rounded bevel, and four metal feet sit underneath.
The bag is a hollow shell, not a solid block. The outer wall rolls over a rim at the top and continues down the inside as a separate lining surface, with its own fabric material.
Inside, I added:
The flap is the hardest part, and it was rebuilt several times (section 4). The final version is a solid 3 mm leather piece:
All surfaces use physically based materials. Claude generated nine tileable leather texture sets with normal and roughness maps: nappa, pebbled calf, saffiano, suede, patent, croc-embossed, snake-embossed, quilted and woven. Printed patterns, such as florals, tartan, leopard and a monogram of your own initials, are generated in the chosen colours and blended with the leather grain.
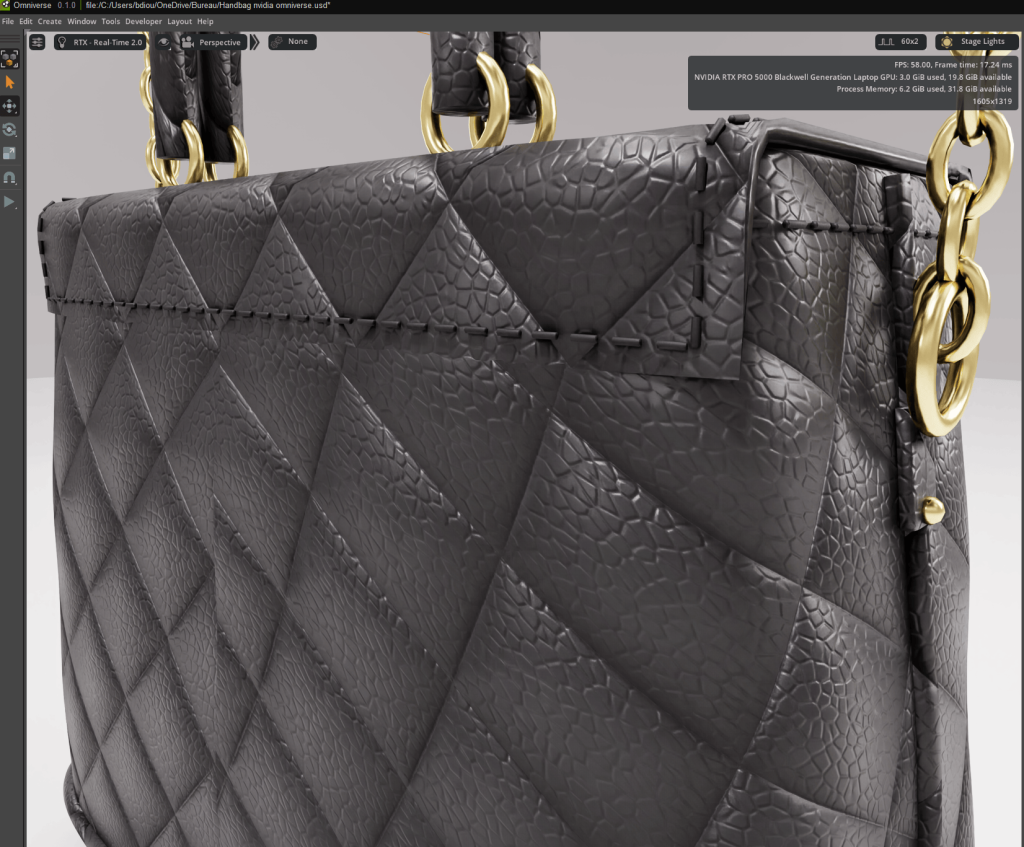
Figure 3: The bag closed, three-quarter view, showing the quilted texture, piping and stitching
Claude acted as my technical partner: I directed the design and judged the results in the viewport, and Claude wrote, tested and fixed the code.
I worked with Claude in the Claude desktop app, connected to my project folder and to the running Omniverse app. That setup mattered. Claude could read the Kit App Template, write the extension’s Python files, run tests, and read Omniverse’s own log after every change.
Most of my requests were short and visual. I would take a screenshot, circle the problem in red, and write one line, such as “the strap rings don’t touch the bag” or “the flap only opens halfway”. Claude then:
I then looked at the result in the viewport and either moved on or sent the next screenshot.
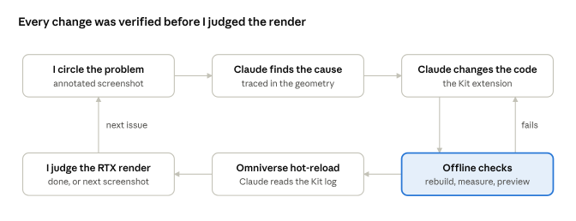 Figure 4: The Iterations
The iteration loop · 6 steps
A failed offline check sent the change straight back to the code, so most problems never reached my viewport.
I made the design calls: the look of the clasp, how far the flap opens, which camera moves to use, the product reveal. Claude made the engineering calls and explained them. Examples:
Twice I asked for things Claude would not build as asked, and in both cases it proposed an alternative:
For the NVIDIA graphics card inside the bag, I load the official logo from my sponsorship kit as a decal, rather than having it redrawn.
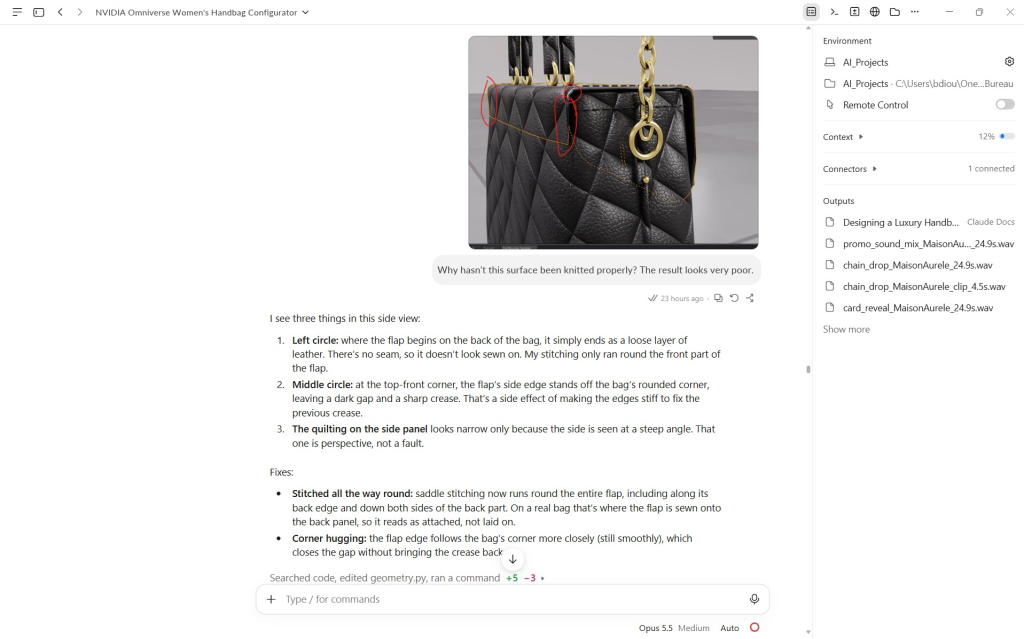
Figure 5: One of my annotated screenshots (a problem circled in red) next to the fixed result
Almost every fix came from the same pattern: a problem I could see in a screenshot traced back to a geometric cause Claude could measure and correct.
| Challenge | Root cause | Solution |
|---|---|---|
| The first bag looked basic and plastic | A single flat material on a smooth loft | Nine procedural PBR leather sets, coloured prints, soft bulging panels, gusset pinch, piping and stitching |
| Strap rings floated about 1 cm from the bag | Rings placed at nominal width; gussets fold inward near the top | Rings anchored to the real side surface on stitched leather tabs with rivets |
| The flap looked like a paper-thin blade | A zero-thickness sheet starting in mid-air above the top | A 3 mm leather shell traced from the body’s own cross-sections, with a painted edge |
| No inside to the bag | The body was a closed solid under the flap | Hollow shell with fabric lining, rolled rim, slip pocket and divider |
| The clasp looked like a generic fastener | A cylinder and a capsule | Domed oval turn-lock; slot cut through the flap with eyelet and back plate |
| A dark slit appeared at the sides | The flap floated above the rim and was narrower than the mouth | Flap rests on the rim and spans the full opening |
| Creases appeared at the flap’s top corners | The edge hugged the rounded corner too closely | “Stiff leather” edges near the corners only |
| The flap looked laid on, not sewn | Stitching only ran around the front | Saddle stitching around the entire flap, including where it joins the back |
| Challenge | Root cause | Solution |
|---|---|---|
| The promo opened zoomed in | Camera distance used only the body, ignoring the strap and handles | Camera fit to the full bounding box; later an exact fit solved per keyframe |
| A bump in the camera speed | The camera took the larger of two distances, creating a kink | One smooth spline through log-distances: under 5% speed change per frame |
| The flap opened as a stiff “L” | A rigid rotation about one hinge | A bend model: the flap folds at the hinge and its curvature relaxes as it lifts |
| Steps appeared along the flap’s edges while opening | Each column folded at a whole row, not a straight line | Fractional hinge position per column, so the fold runs straight |
| Top handles blocked the flap | Handles stood in the flap’s path | Handles moved behind the hinge and tilt back 82° as the flap opens to 150° |
| The chain fell too fast and barely touched the bag | Real gravity is fast; handles and the open flap weren’t obstacles | Slow-motion speed ramp, collisions with handles and flap, friction measured in time, not steps |
| The graphics card was hard to see inside the bag | Camera looked in at 58°, so the front wall hid the card | Interior shot at 72°, aimed at the card’s face |
| The card reveal cut the ending short | The video length was fixed | Video length adapts: reveal plus enough time for the hero shot and chain drop |
Two lessons stood out. First, a precise screenshot beats a long description: circling the exact spot got the right fix almost every time. Second, numeric checks caught problems before I saw them, such as the camera clipping a tall strap during the descent from the bird’s-eye view.
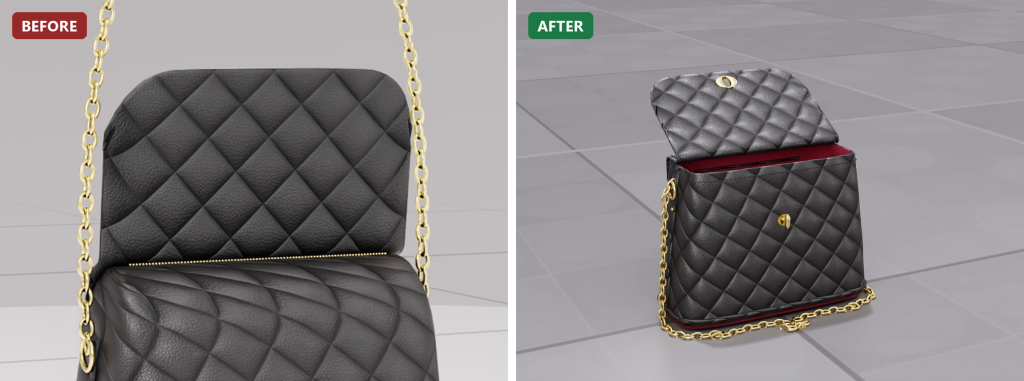
Figure 6: before/after pair — the rigid flap opening vs. the soft-bend opening
The final deliverable is a 25-second path-traced promo film, rendered inside Omniverse with Movie Capture, plus live configuration in the RTX viewport.
Every change in the panel rebuilds the USD geometry and materials directly in the open stage. In RTX Real-Time 2.0 the viewport stays interactive while I change leather, prints, colours or hardware, so I can show clients variations in real time.
The extension writes standard USD: meshes with UVs, UsdPreviewSurface materials, lights and an animated camera. The bag can be exported as a self-contained .usda file with its textures, so it opens in any USD tool.
The promo is fully generated from the panel: one click builds the camera path, the clasp and flap animation, the card reveal and the chain physics as USD time samples.
| Time (s) | Shot |
| 0–7 | Bird’s-eye view of the bag, a slow turn, a spiral down, and a close-up on the clasp |
| 7–10.5 | The knob turns 90°, the flap folds back, the top handles lie back |
| ~11 | The camera looks down into the lined compartment |
| 13–15 | The graphics card rises out of the bag and turns to face the camera |
| 15–18 | Showcase: a slow orbit around the floating card, with a light sweep across it |
| 18–20 | The card sinks back into the bag |
| 20–25 | Hero shot; the gold chain falls onto the bag and settles on the floor |
A few techniques made it feel like a real product film:
The panel exposes RTX settings that matter for a premium look: depth of field that follows the bag, bloom, motion blur, film grain with vignette, colour grades, a seamless studio backdrop and a glossy reflective floor.
For the final render, I used Movie Capture’s path tracer:
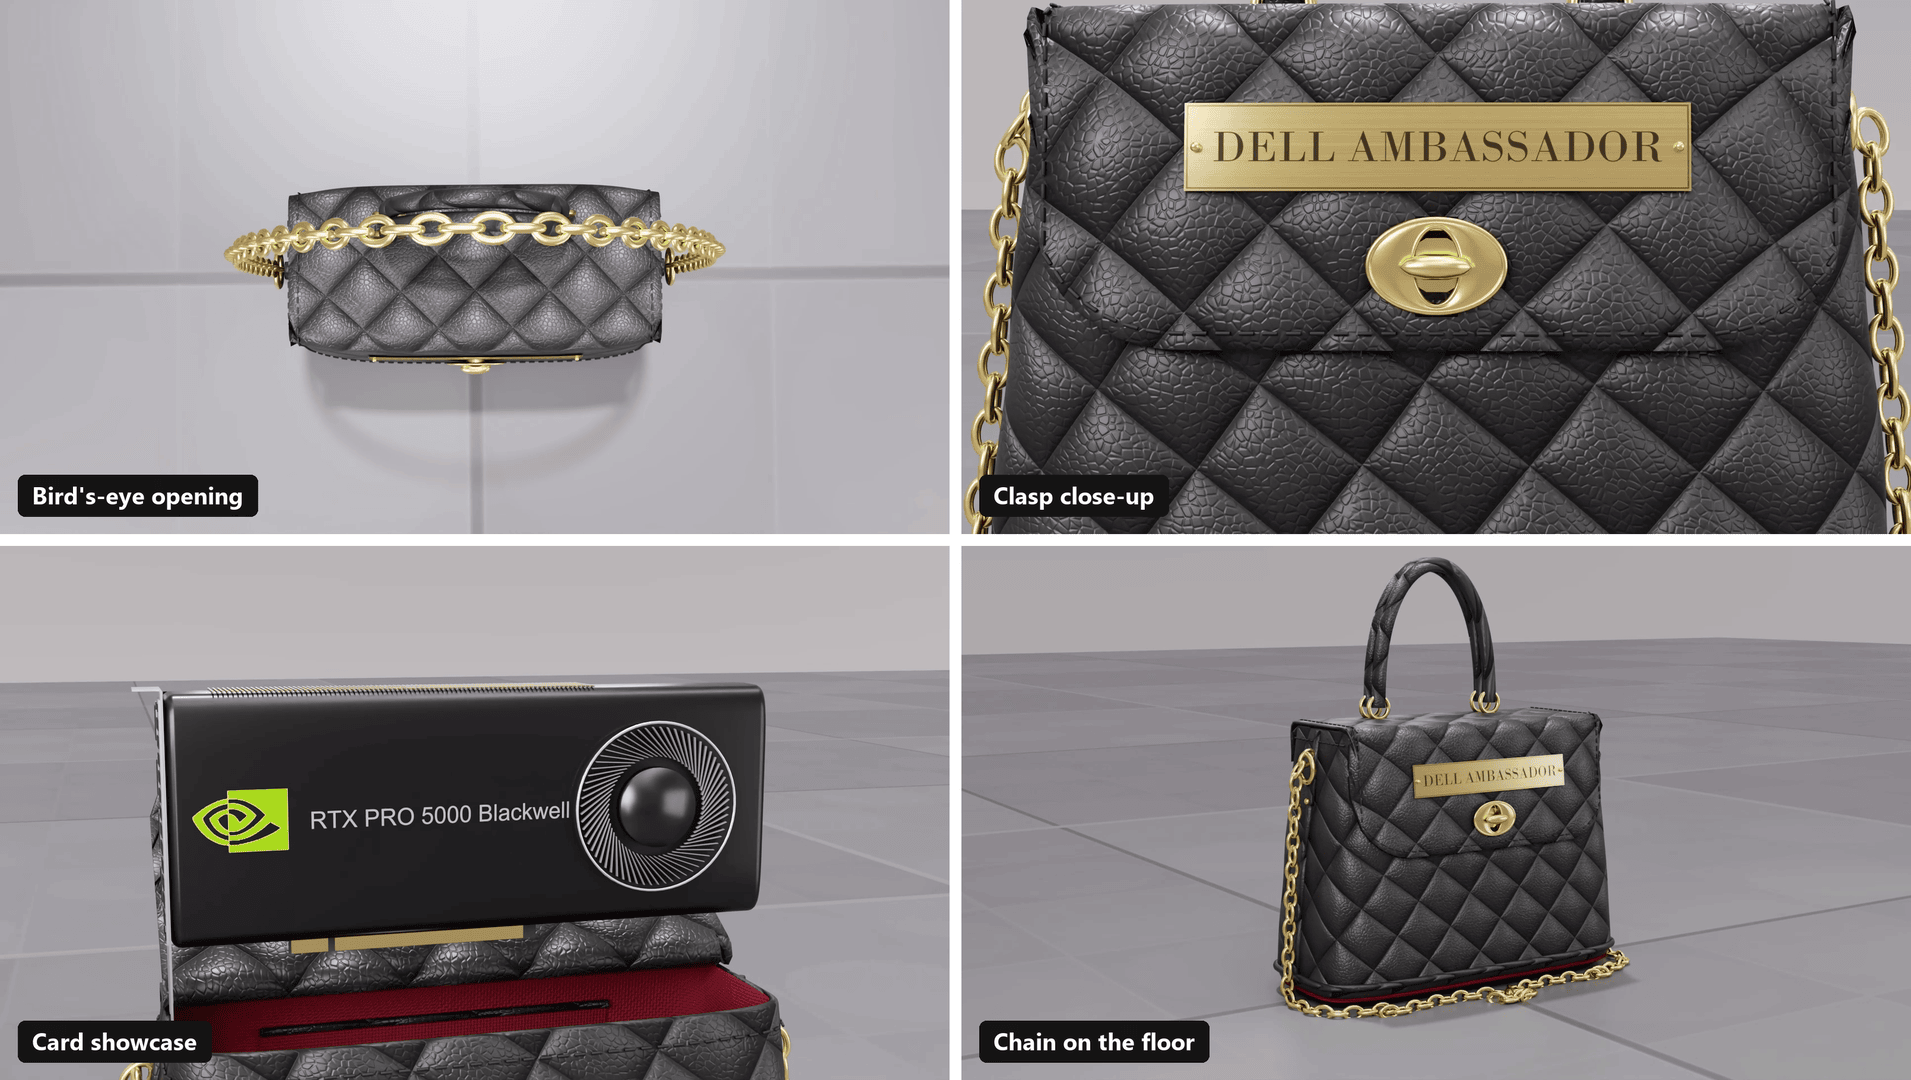
Figure 7: 3–4 stills from the promo: bird’s-eye, clasp close-up, card showcase, chain on the floor
The whole project — modeling, live configuration and final rendering — ran locally on one mobile workstation, with the RTX viewport staying above 140 FPS while I worked.
Disclosure: I am a Dell Ambassador, and Dell provided the Dell Pro Max 16 Plus used for this project. The NVIDIA graphics card shown in the promo appears as part of a brand sponsorship.
| Component | Specification |
| Laptop | Dell Pro Max 16 Plus |
| GPU | NVIDIA RTX PRO 5000 Blackwell (laptop), 24 GB VRAM |
| System memory | 64 GB RAM |
| CPU | Intel® Core™ Ultra 9 Processor 285HX |
| Software | NVIDIA Omniverse Kit 110.4 (USD Composer-based app from the Kit App Template), RTX Real-Time 2.0 and path tracing |
My first test render captured 241 frames and encoded an 11.4 MB MP4 in about 10 minutes, roughly 2.5 seconds per frame.
For the final film, these numbers from my own render:
| Measurement | Result |
| Final render settings | 3840×2160, path traced, 256 spp, Mp4 Video |
| Frames / video length | 599 frames / 24.9 s |
| Total render time | 5h55m |
| Average time per frame | 35.86s |
| GPU utilization during the render | 94% |
| Dedicated GPU memory used | 9GB |
| System RAM used | 31.8 GB |
| CPU utilization | 12% |
| Power source | On AC power (Dell Pro Thunderbolt 5 Smart Dock) |
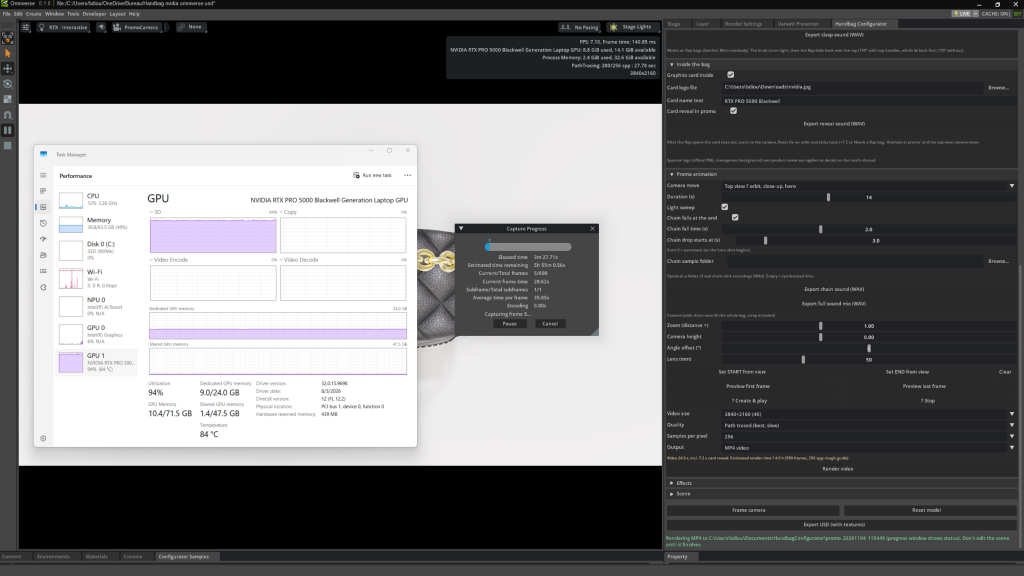
Figure 8: Task Manager, Performance tab, GPU page during the path-traced render]
The final 8K render images are also available as a ZIP download. The archive is over 39 MB, so I’ve provided it separately rather than embedding the full-resolution images in the article. 8K Render
The combination worked because each part did what it is best at: I judged the design, Claude engineered and verified it, Omniverse rendered it, and the workstation kept every step local and interactive.
The project came together through a combination of AI-assisted development, procedural modeling, and real-time visualization. Claude helped me write and refine the Python code, while NVIDIA Omniverse brought the handbag configurator and animation to life. The final step was rendering the promotional video using the RTX PRO 5000 Blackwell GPU in the Dell Pro Max 16 Plus.
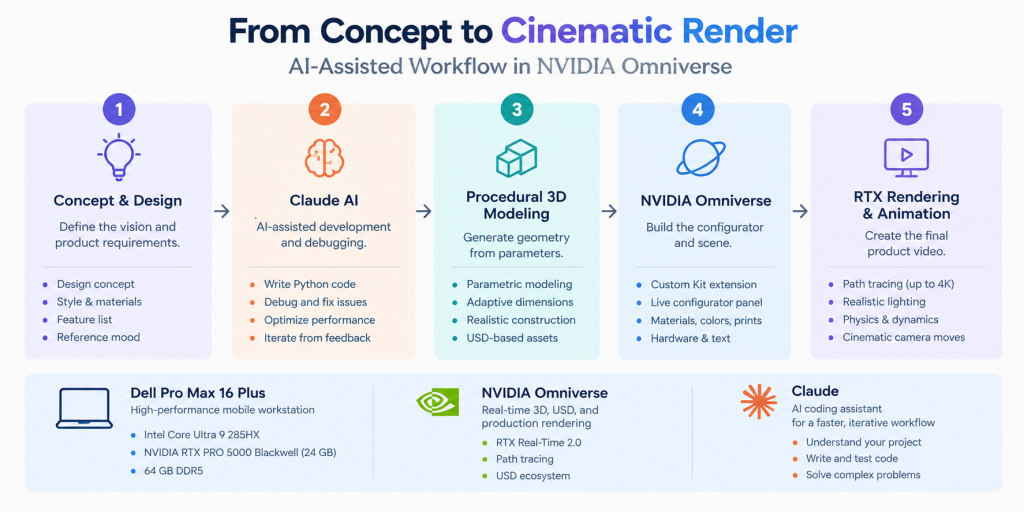
Figure 9: AI-Assisted Workflow from Concept Design to Cinematic Rendering in NVIDIA Omniverse.
The project was developed and rendered on the Dell Pro Max 16 Plus, powered by the NVIDIA RTX PRO 5000 Blackwell Laptop GPU with 24 GB VRAM, 64 GB RAM, and an Intel Core Ultra 9 285HX, paired with a Dell UltraSharp Curved 49-inch QHD Monitor. This setup handled the procedural modeling, Omniverse configurator, and final 4K path-traced rendering.
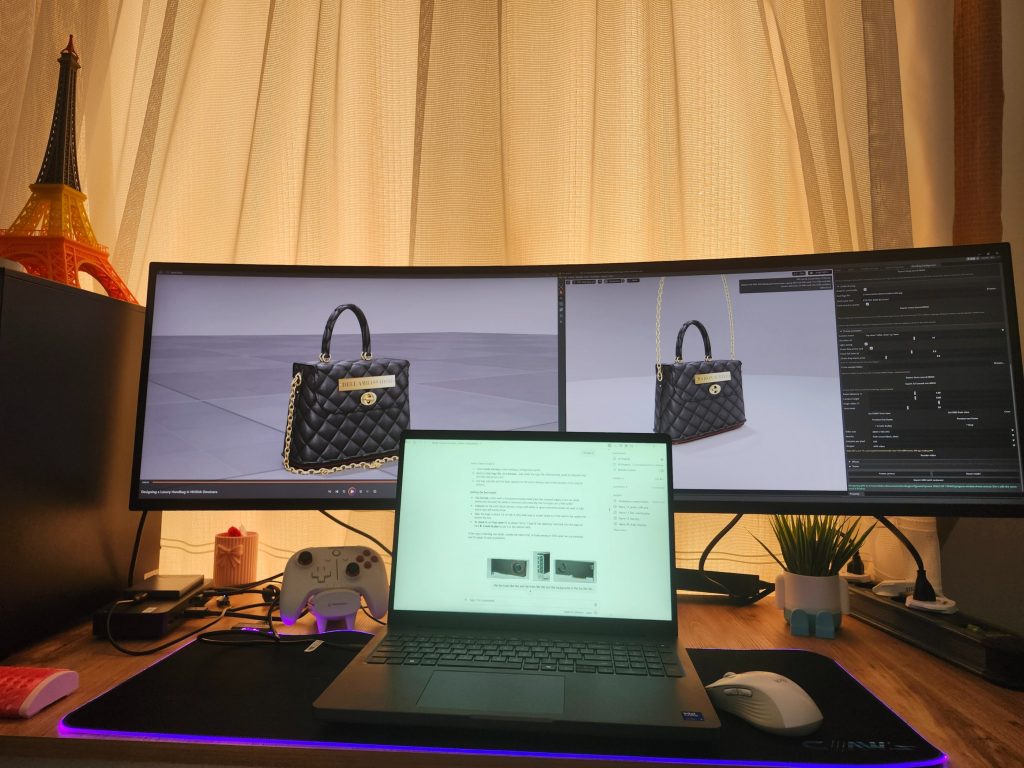
Figure 10: My Workstation
This project showed how AI-assisted development and real-time 3D visualization can come together to turn an idea into a working experience. It was a great opportunity to explore new creative and technical possibilities with NVIDIA Omniverse.

