

Engineering data management goes beyond simply storing and organizing CAD files. As projects become more complex and teams grow, it becomes increasingly important to control design revisions, manage product information, coordinate approval workflows, and ensure that the right people can access the right data.
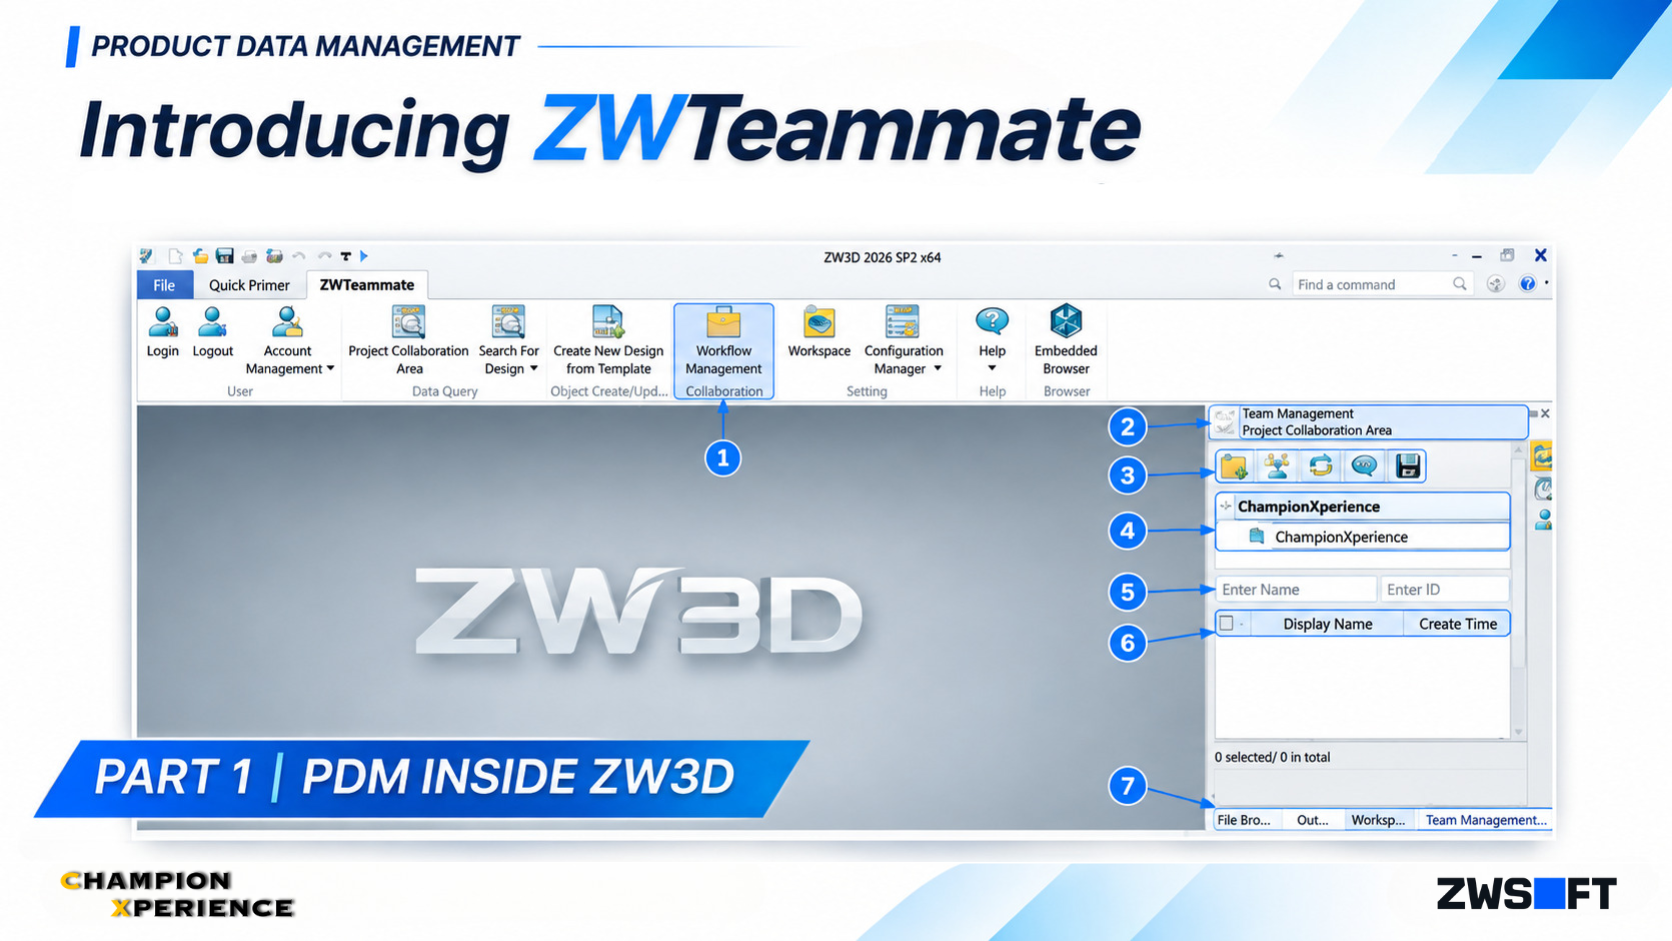
ZWTeammate addresses these needs by connecting CAD-based design activities with browser-based data management. In Part 1, we explored its integration with ZW3D, looking at tools for project collaboration, workspace management, design search, and workflow operations directly within the CAD environment.
In this second part, we’ll focus on the ZWTeammate web client. We’ll first look at its user types and licensing packages to understand how access and responsibilities are organized. Then, we’ll explore the interface, including the home page, advanced search, project navigation, and Part and Design records. Finally, we’ll examine how users can review engineering information and follow workflows through the browser, providing a broader view of how ZWTeammate supports collaboration beyond the CAD workspace.
First, a quick definition. PDM stands for Product Data Management. In simple terms, it is a system for organizing and controlling product-related information, including CAD models, drawings, and supporting documents.
Instead of relying on separate file copies and manual communication, a PDM system provides a shared environment where engineering data can be stored, accessed, and managed. It also helps teams follow changes and understand the current state of a design.
ZWTeammate brings these capabilities to the ZW3D environment. ZWSOFT describes the platform as supporting task coordination, revision tracking, and controlled data publishing.
Its approach serves two groups. Engineers can work with design data and collaboration tools inside ZW3D, while colleagues outside the CAD environment can use the web client to find and review engineering information.
ZWTeammate provides two ways to access your PDM environment: directly inside ZW3D or through a web browser. Although both interfaces connect users to engineering data, they offer different tools and ways of working.
Let’s start with the ZW3D interface and explore the options available to an engineer during daily design work.
After installation, ZW3D adds a new ZWTeammate tab to the ribbon. This is where you can access the main PDM tools without leaving your CAD environment.
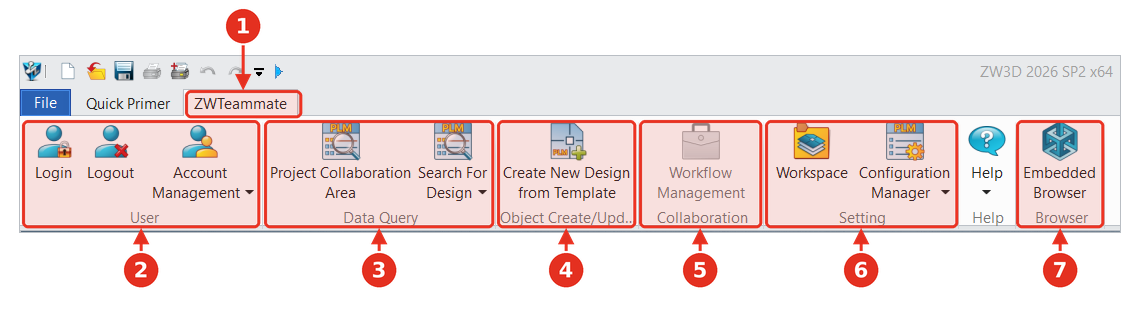 Figure 2A. The ZWTeammate ribbon tab and login window in ZW3D 2026 SP2.
The ribbon is organized into several groups, each covering a different task:
Before accessing the PDM tools, you need to log in to ZWTeammate. The login window includes the following options:
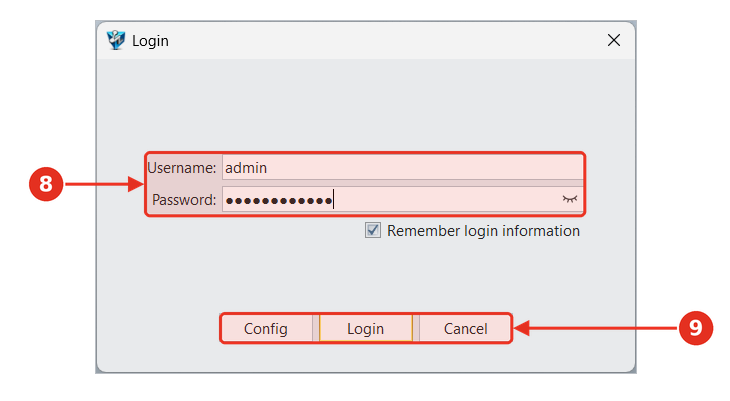 Figure 2B. The ZWTeammate ribbon tab and login window in ZW3D 2026 SP2.
After logging in, the Team Management panel appears on the right side of the ZW3D interface. It opens the Project Collaboration Area, where you can view and access your available projects. In this example, the project list contains one project: ChampionXperience.
The panel also includes a toolbar with several project management options, filters to search by name or ID, and a result list showing the available items.
At the bottom, you will find four dock tabs: File Browser, Output, Workspace, and Team Management. These tabs share the same panel area, so you can switch between them without leaving your usual ZW3D workspace.
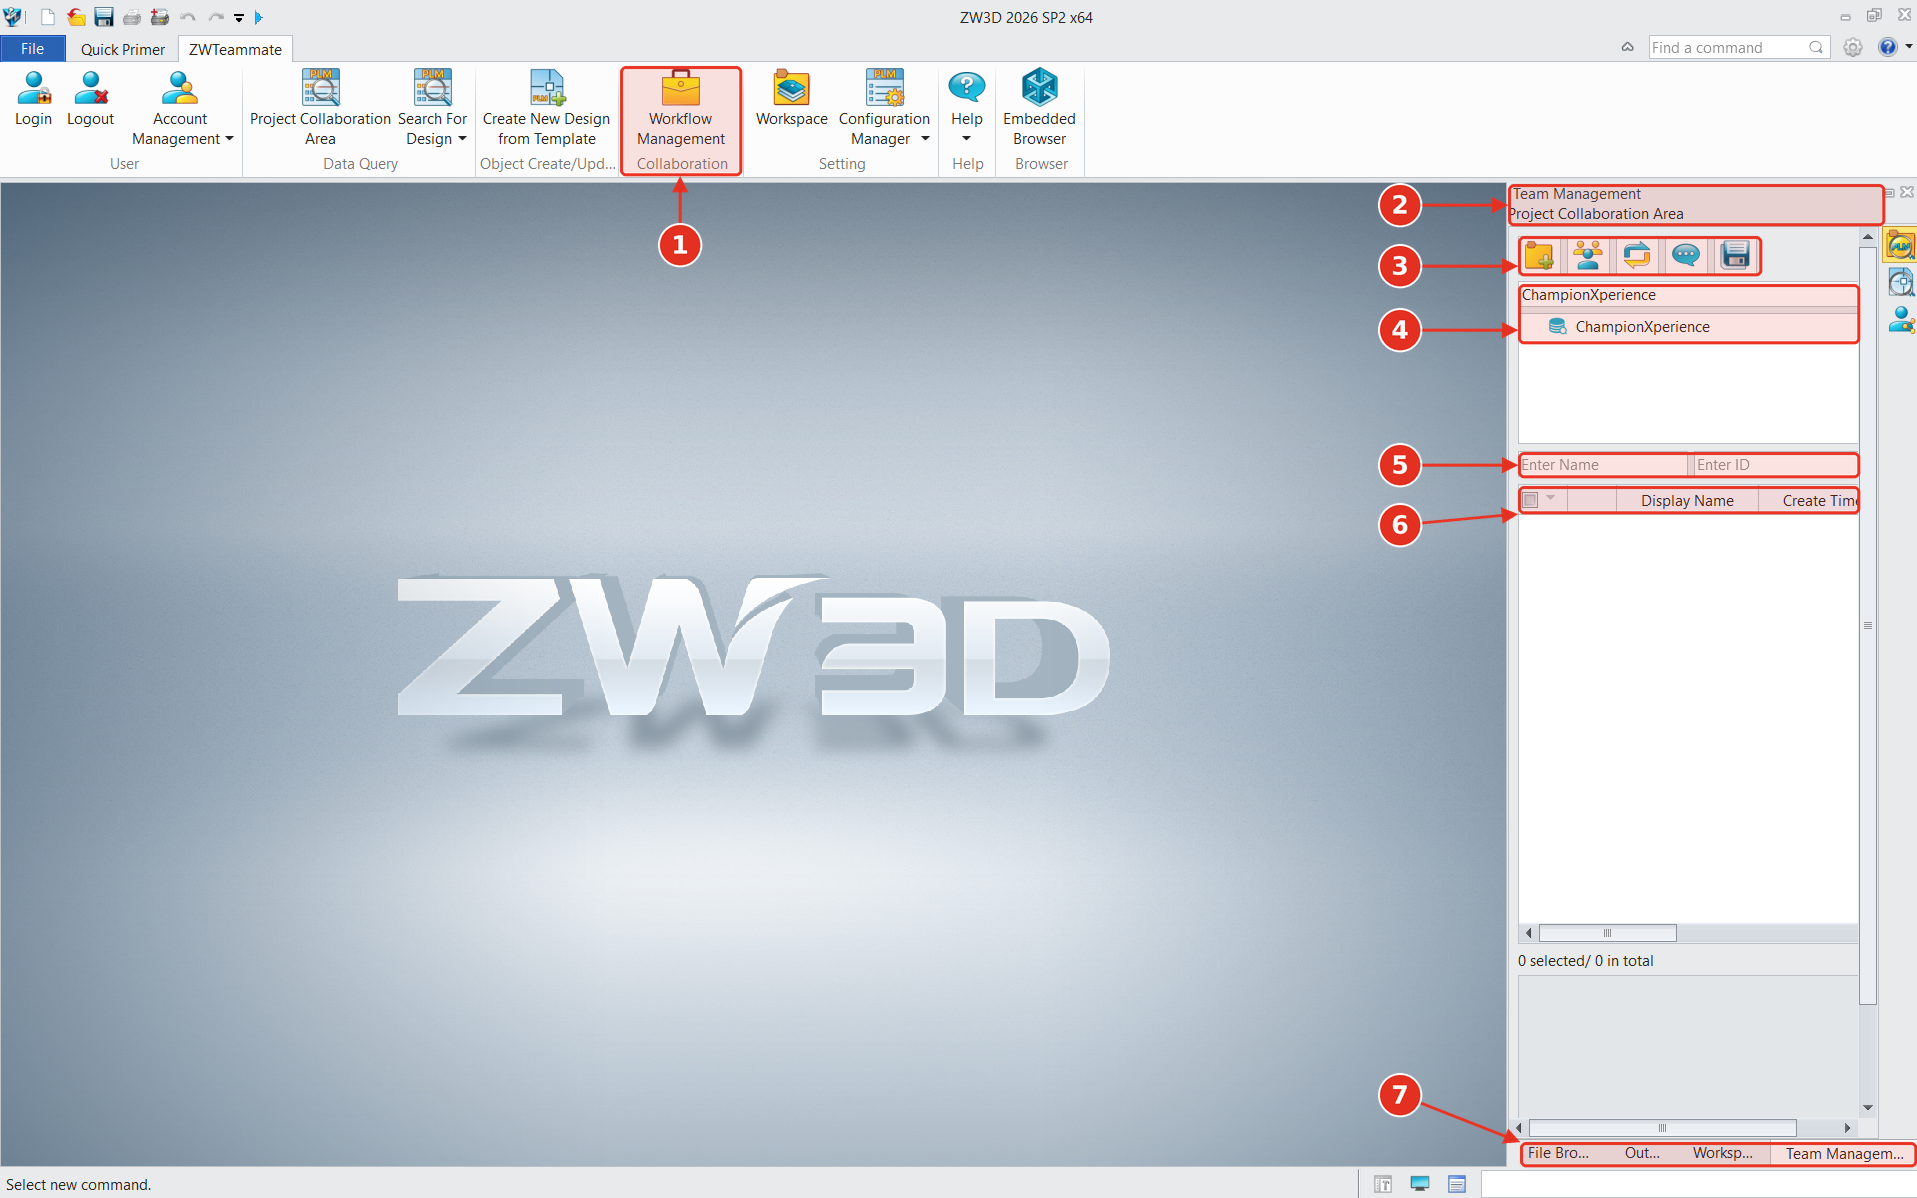 Figure 3. The Team Management panel docked inside ZW3D after login, with numbered callouts.
ZWTeammate also allows you to manage user accounts directly from inside ZW3D. The Account Manage window displays the existing accounts along with their creation time, phone number, and email address.
From the toolbar, you can refresh the account list, create or discard accounts, and reset passwords. When adding a new account, only the account name is required. Phone and email information are optional.
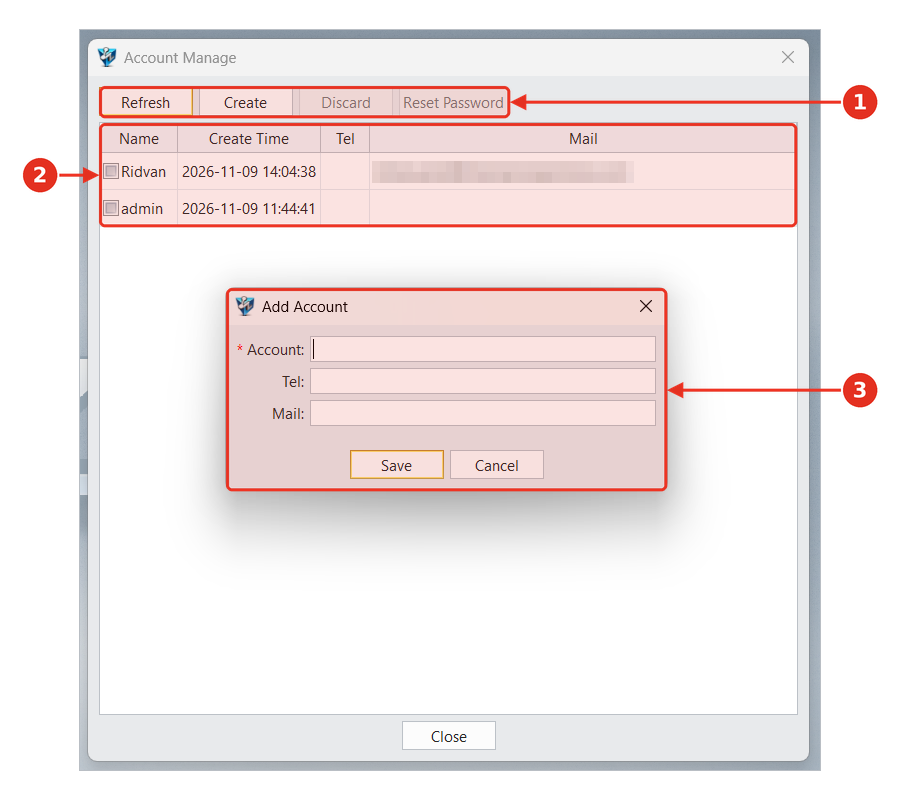 Figure 4. Account Management inside ZW3D, with the Add Account dialog open.
When creating a new design in ZWTeammate, you can start with an existing template. The Create Design from Template dialog lets you choose the design type, child type, and template you want to use.
In this example, the selected template is PartTemplate(MM), which is a metric part template. You can enter a design ID manually or let the system generate one using the Assign button. Then, enter the design name and select the team and folder where you want to store it.
This way, the design is linked to the correct project and folder from the beginning.
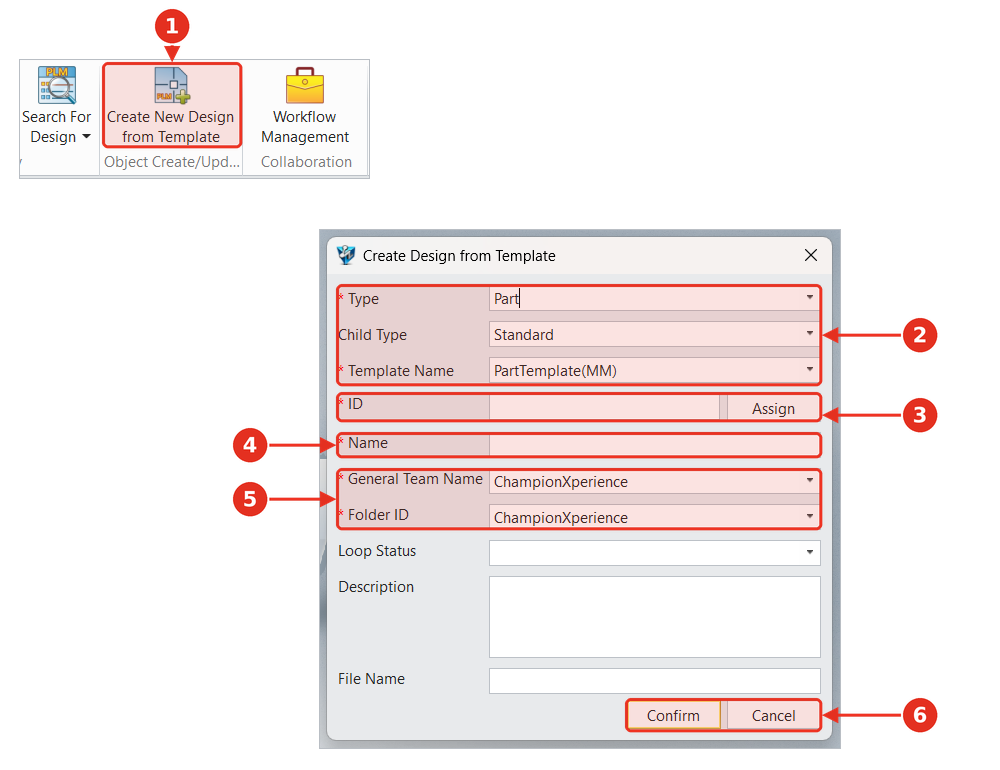 Figure 5. The Create Design from Template dialog and the ribbon button that opens it.
The Workspace option, available in the Setting group, opens a panel where you can manage the engineering files stored on your computer and check their status against the server.
In this example, the workspace contains one file: Part001.Z3PRT, with the display name Des-0000002,A,1:Part001.
One useful feature is the row of status filters above the file list. These filters help you quickly identify what is happening with your files. For example, you can check whether a file has been modified, whether a newer version is available on the server, or whether a file is currently checked out by you or another user.
The panel also provides a set of commands to manage your files. You can refresh the list, update a file from the server, open it, upload your changes, or remove it from your workspace. For example, Update File downloads the latest available copy from the server, while Upload File sends your local file to the server.
At the bottom of the panel, the Preview tab displays a 3D thumbnail of the selected file, while the Detail tab provides additional information, such as its revision, sequence, life cycle status, checkout lock status, vault status, owner, creator, and creation and modification dates.
 Figure 6. The Workspace panel in ZW3D, widened to show all available status filters and file information.
The Configuration Manager lets you define where new engineering data will be stored. It opens the Working Directory Configuration dialog, which contains four fields: one for the Project Collaboration Area and three for the target locations of Parts, Designs, and Documents.
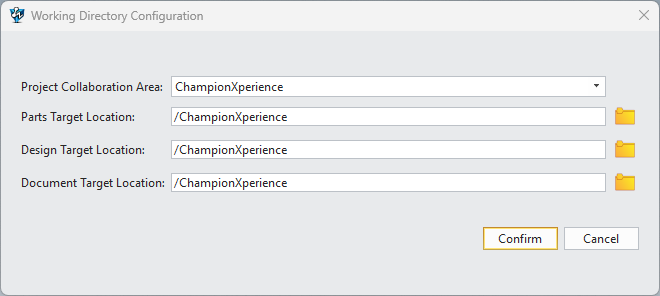 Figure 7. Working Directory Configuration dialog.
These settings determine the default folder locations used when creating new items. For example, the folder selected here is reflected in the Create Design from Template dialog shown in Figure 7.
The Configuration Manager dropdown also provides access to Template Management for Project Collaboration Area, Template Management for Design, and Import Library. These options are used to manage the project and design templates available in ZWTeammate, including the templates used when creating a new design.
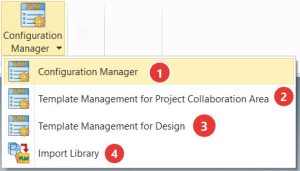 Figure 8. Working Directory Configuration dialog.
The Search For Design option opens a menu with four commands: Search For Design, Search For Parts, Search For Document, and Change Notice Management.
Selecting Search For Design opens the Design Management panel. The panel displays a folder tree at the top and the matching design records below it, making it easier to navigate the available data and find the design you need.
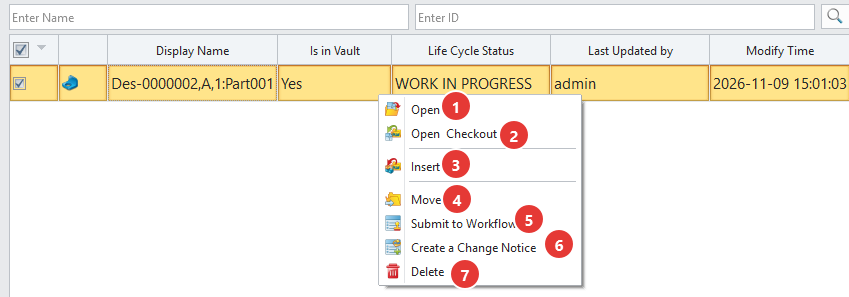 Figure 9. Search For Design in ZW3D, showing the Design Management panel and the available actions in the right-click context menu.
Right-clicking a design in the results list opens a context menu with the following actions:
These commands bring common PDM operations directly into the CAD environment. For example, an engineer can check out a design, submit it for approval, or start a change notice without leaving ZW3D.
The Embedded Browser button opens the ZWTeammate web client in a tab inside ZW3D. In this example, it displays the Workflow page, providing access to different task categories and filters.
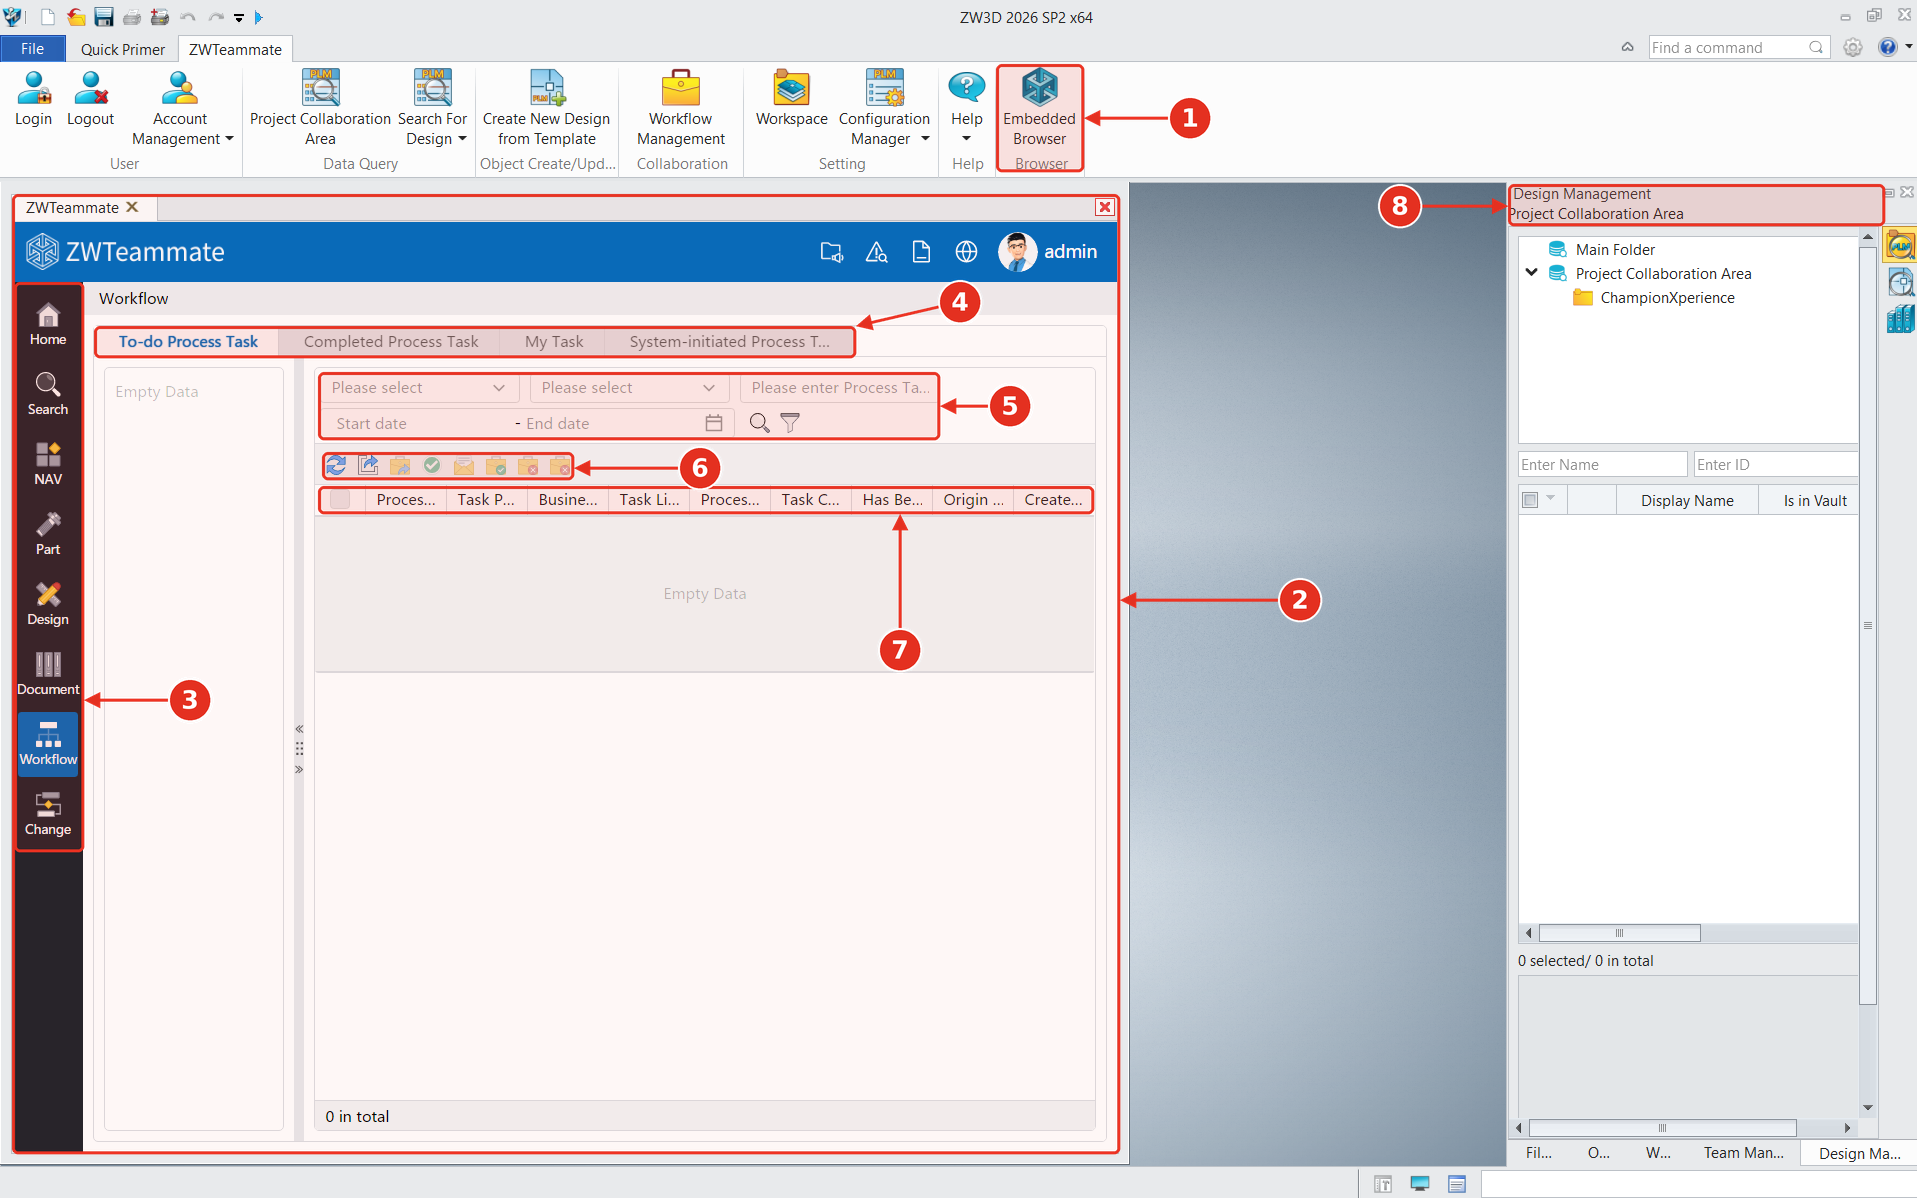 Figure 10. The ZWTeammate Workflow page opened inside ZW3D using the Embedded Browser.
In Part 2, we will explore the web client in more detail, including its pages, search tools, and workflow features.
ZWTeammate brings essential PDM tools into the ZW3D environment, helping engineers manage designs, organize project data, control local files, and coordinate approval workflows without constantly switching applications.
But engineering collaboration extends beyond the CAD workspace. In Part 2, we’ll explore the ZWTeammate web client and see how other team members can access and work with engineering data through a browser.
To learn more about ZW3D and try it free for 30 days, use the link.

