
© 2023 Created by blog.championxperience.com

Wondering how to add SOLIDWORKS features to your xShape designs? Many designers begin in xShape to create smooth, freeform shapes, then move their models into SOLIDWORKS to add detailed features like holes, cuts, or supports. This approach combines the creativity of subdivision modeling with the precision of CAD — ideal for designing chairs, plastic parts, or ergonomic products.
In this example, we’ll design a modern chair using xShape, then improve it in SOLIDWORKS by adding features that prepare it for production.
1. Start the Chair Concept in xShape
We start by making the basic shape of the chair in xShape. xShape lets you shape the model easily by pulling and pushing the surfaces.
Once you’re happy with the design, you save it to the 3DEXPERIENCE platform. The system will then automatically turn the model into exact geometry that can be used in SOLIDWORKS.

2. Open the xShape Chair in SolidWorks
To open the chair model in SOLIDWORKS, you do not use the traditional Open command. xApp components are opened using:
- Drag-and-drop from the xShape window into the SOLIDWORKS workspace

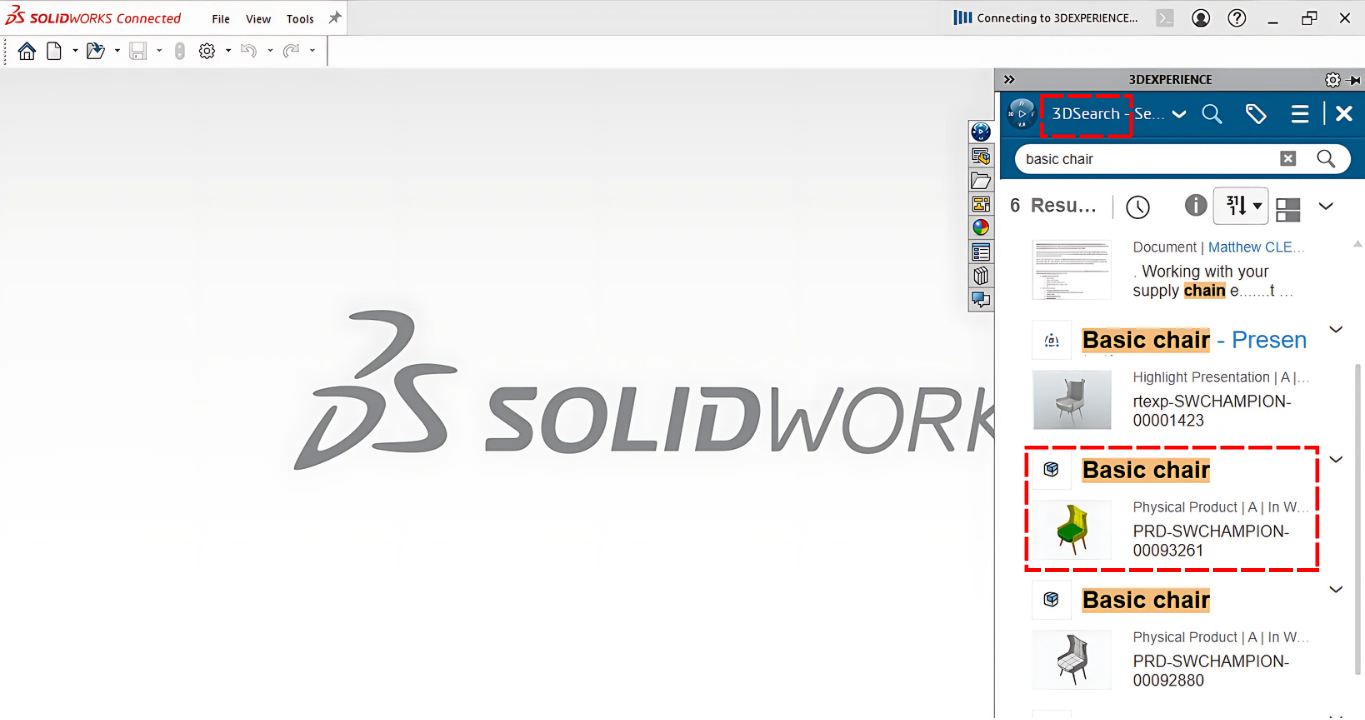
- 3DSearch or the Bookmark Editor via the MySession tab in SOLIDWORKS
During this process, a temporary CATPart file is created, converted into a SOLIDWORKS part, and auto-oriented with Z-up to match xShape’s orientation.
3. Derived Part from the Native xShape Model
To preserve your enhancements and allow saving back to 3DEXPERIENCE, create a derived part from the native xShape chair model.
You can:
-
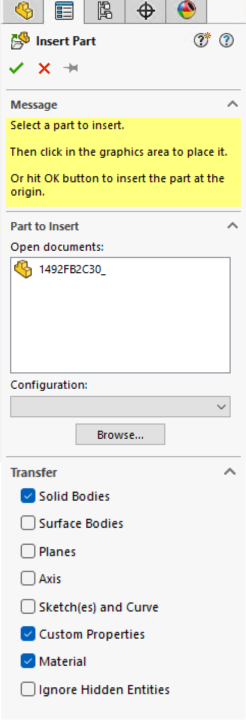
Use the Insert Part feature to insert the native model into a new SOLIDWORKS part
-
Make sure to use a Z-up part template for consistent orientation
Once inserted, save the new part locally and to the 3DEXPERIENCE platform. The FeatureManager tree will show the native xShape chair as a Physical Product, confirming its original source.
Tip: Name the new part file clearly, such as “Chair – SW”, to avoid confusion with the original xShape file.
You can customize visual properties like color or texture using the Display Manager based on the part template used.
4. Add Detailed Features in SolidWorks
Now that the chair design is in a SOLIDWORKS-native format, you can enhance it with precise engineering details.
For example, in this workflow, we added tapped holes to the chair legs using the Hole Wizard. This feature is not available in xShape, but SOLIDWORKS offers more technical depth and control when it comes to hole placement, thread standards, and fit specifications. This makes it ideal for preparing parts for manufacturing or assembly.


Other enhancements you can make at this stage include:
-
Structural support ribs
-
Slot cuts, chamfers, or fillets for manufacturability
-
Embossed or engraved logos
-
Mounting references for connecting parts
Before applying changes, don’t forget to lock the component in the MySession tab. This ensures you have exclusive editing access while working in a collaborative cloud environment.
Conclusion
This example shows how to start a design in xShape and then add more details using SOLIDWORKS. We used a chair model, but the same steps work with other browser-based tools like xDesign or xSheetMetal.
In real projects, you might need to go back and change your first design. You can do that, and the changes will update in SOLIDWORKS — if you follow the right steps. But if the shape changes too much, some features in SOLIDWORKS might break or not work correctly.
To avoid problems, it’s best to wait until your xShape model is mostly finished before adding extra features in SOLIDWORKS. This helps keep everything working and saves time later.
Sales Development Representative at ChampionXperience
Hanen Bdioui is the Editor-in-Chief at ChampionXperience, where she leads content on CAD, VR, and emerging engineering technologies. She works with Dassault Systèmes as a Content Creator and SOLIDWORKS Application Engineer, and contributes as a technical writer for Engineering.com and EngineeRules, covering topics in CAD, PLM, and simulation. Hanen also creates specialized content for 3DEXCITE, the 3DEXPERIENCE platform, and Onshape, supporting engineers and companies in adopting modern digital workflows.
Latest posts by Hanen Bdioui (see all)
- How to Create a Custom Material in SOLIDWORKS - 15 May 2026
- Onshape MBD: All in One Place for Design, GD&T and Manufacturing - 18 April 2026
- MySession Missing in SOLIDWORKS Design? Fix It in Less Than 1 Minute - 6 March 2026
Subscribe
0 Comments
Oldest
